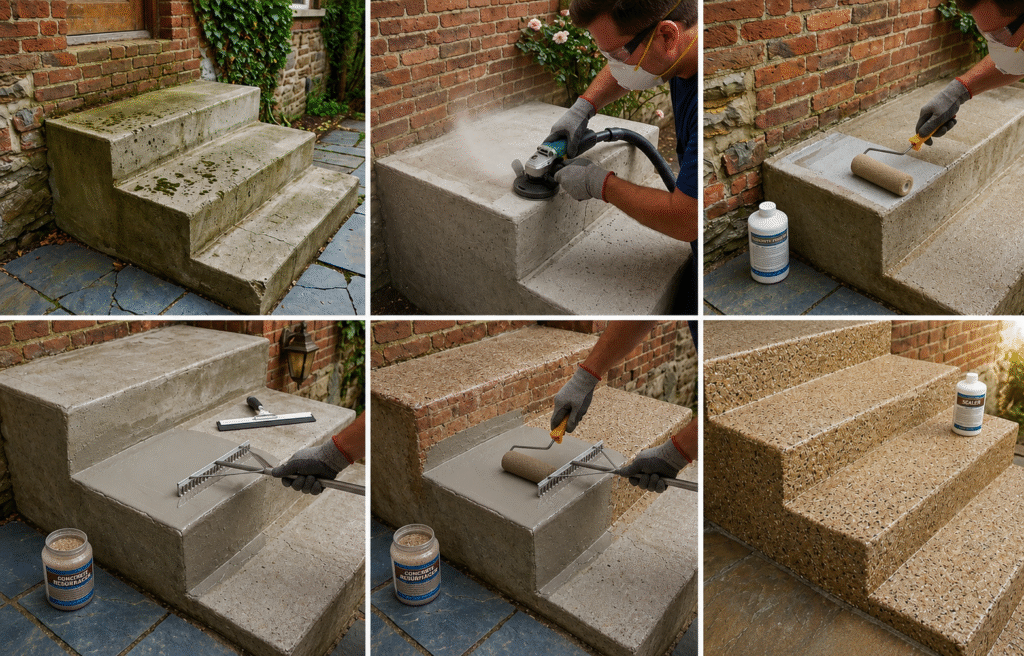
How to Repair Broken Concrete Steps | Patching vs Rebuilding
Broken concrete steps create safety hazards, and they also lower your home’s curb appeal. Fortunately, you can fix most cracks, chips, and crumbling edges yourself with the right materials and technique. Whether you’re dealing with hairline cracks or a fully crumbled step, this guide walks you through the process so you can restore your concrete steps quickly and affordably.
Why Concrete Steps Break Down
Concrete steps endure constant foot traffic, weather exposure, and temperature swings. Consequently, several factors cause damage over time:
- Freeze-thaw cycles: Water seeps into tiny cracks, then freezes and expands, which widens the damage.
- Poor drainage: Water pooling near the base erodes the concrete and undermines the foundation.
- Age and wear: Older concrete loses strength, so it becomes more prone to chipping.
- Incorrect original mix: If the concrete wasn’t mixed or cured properly, it deteriorates faster.
- Heavy loads or impacts: Dropped tools, furniture moves, or vehicle contact can crack steps instantly.
Understanding the cause helps you prevent repeat damage after you complete the repair.
Tools and Materials You’ll Need
Before you start, gather these supplies so the project moves smoothly:
- Concrete patch compound or vinyl concrete repair mix
- Concrete bonding adhesive
- Wire brush and chisel
- Hammer and cold chisel (for larger breaks)
- Trowel and margin trowel
- Wood forms or plywood (for rebuilding step edges)
- Rebar or wire mesh (for structural repairs)
- Safety goggles, gloves, and a dust mask
- Water and a mixing bucket
- Concrete sealer
Step-by-Step Concrete Steps Repair Process
1. Assess the Damage
First, inspect the steps closely to determine whether you’re dealing with surface-level cracks or structural damage. Small hairline cracks and chipped corners typically need only a patch compound. However, if a step wobbles, sinks, or has crumbled through its full depth, you’ll need a more involved rebuild.
2. Clean the Area Thoroughly
Next, remove loose debris, dirt, and old crumbling concrete with a wire brush and chisel. Afterward, rinse the area with water to eliminate dust, since patch compounds won’t bond well to a dirty surface. Let the area dry completely before moving forward.
3. Undercut the Damaged Edges
For chipped or broken corners, angle your chisel to undercut the edges slightly, so the repair material locks into place rather than sitting on a flat, shallow surface. This step significantly improves the longevity of the patch.
4. Apply Bonding Adhesive
Then, brush a concrete bonding agent onto the cleaned, dry surface. This adhesive helps the new patch material fuse with the old concrete instead of simply sitting on top of it, which reduces the risk of future separation.
5. Mix and Apply the Repair Compound
Follow the manufacturer’s instructions to mix your patch compound to a workable, putty-like consistency. Afterward, press it firmly into cracks and voids using a trowel. For larger breaks, build the material up in thin layers rather than one thick application, since thin layers cure more evenly and resist cracking.
6. Rebuild Broken Step Edges (If Needed)
If an entire step, corner, or edge has broken off, secure a wood form against the step to recreate the original shape. Then, insert a small piece of rebar or wire mesh for reinforcement before pouring the repair mix. This addition strengthens the new section and prevents it from breaking away again.
7. Smooth and Shape the Surface
While the compound is still workable, smooth it with a trowel to match the surrounding step’s texture and slope. Additionally, angle the surface slightly, so water drains away rather than pooling on the step.
8. Cure the Repair Properly
Once you finish shaping the patch, cover it with plastic sheeting and let it cure for the time specified on the product label, typically 24 to 72 hours. During this period, avoid walking on the step, since premature use weakens the bond.
9. Seal the Concrete
Finally, apply a concrete sealer once the patch cures fully. Sealing protects your repair from moisture, prevents future freeze-thaw damage, and extends the life of the entire step.
Helpful Tips for a Longer-Lasting Repair
- Work in mild weather. Extreme heat or cold affects curing time and bond strength, so aim for temperatures between 50°F and 80°F.
- Match the color. Add concrete pigment to your patch mix, so the repair blends with the existing steps instead of standing out.
- Address drainage issues first. If water pooling caused the original damage, fix the drainage problem before repairing the concrete, or the new patch will fail too.
- Reinforce high-traffic steps. Adding wire mesh or rebar to heavily used steps increases durability significantly.
- Don’t rush the cure time. Walking on the repair too soon is the most common reason patches fail prematurely.
Benefits of Repairing Concrete Steps Promptly
- Improved safety: Repaired steps reduce trip-and-fall hazards for family members and visitors.
- Better curb appeal: Clean, intact steps enhance your home’s overall appearance and resale value.
- Cost savings: Small repairs now prevent expensive full replacements later.
- Extended lifespan: Sealing and reinforcing steps protects them against future weather damage.
- Increased property value: Well-maintained exteriors consistently attract higher offers from buyers.
Helpful Tips for a Longer-Lasting Repair
- Work in mild weather. Extreme heat or cold affects curing time and bond strength, so aim for temperatures between 50°F and 80°F.
- Match the color. Add concrete pigment to your patch mix, so the repair blends with the existing steps instead of standing out.
- Address drainage issues first. If water pooling caused the original damage, fix the drainage problem before repairing the concrete, or the new patch will fail too.
- Reinforce high-traffic steps. Adding wire mesh or rebar to heavily used steps increases durability significantly.
- Don’t rush the cure time. Walking on the repair too soon is the most common reason patches fail prematurely.
- Clean thoroughly before patching. Remove all loose debris, dust, and crumbling concrete with a wire brush, and rinse the area. Patches applied over dirty or loose surfaces won’t bond properly, no matter how good the mix is.
- Use a bonding agent on old concrete. Since old concrete doesn’t naturally adhere well to new patches, brushing on a concrete bonding adhesive before applying the repair mix creates a much stronger connection.
- Undercut damaged edges. Instead of feathering the patch to a thin edge, cut the damaged area so it’s slightly wider at the bottom than the top. This “keys” the patch in place and prevents it from popping out under pressure.
Cost of Repairing Concrete Steps
Concrete steps repair costs vary depending on damage severity and whether you hire a professional:
- DIY patch compound: $10–$30 per bag, which covers small to medium cracks.
- Bonding adhesive: $15–$25 per container.
- Rebar or wire mesh: $10–$40, depending on the size of the repair.
- Professional repair: $300–$800 for minor to moderate damage.
- Full step replacement: $1,000–$3,000 or more, depending on the number of steps and materials used.
Overall, DIY repairs cost significantly less than hiring a contractor, though larger structural issues often require professional assessment.
Final Thoughts
Repairing broken concrete steps doesn’t have to be complicated or expensive. By cleaning the area properly, using bonding adhesive, reinforcing larger breaks, and sealing the finished repair, you can restore your steps’ strength and appearance for years to come. Additionally, addressing the root cause, whether it’s drainage or age, ensures your repair lasts rather than becoming a recurring project.
Frequently Asked Questions (FAQs)
Q: How long does a concrete step repair last?
A: A properly executed repair, including bonding adhesive, reinforcement, and sealing, typically lasts 10–15 years or longer.
Q: Can I repair concrete steps in cold weather?
A: Cold temperatures slow curing and weaken bonding, so it’s best to wait until temperatures stay above 50°F.
Q: Do I need a professional for small cracks?
A: No, small cracks and surface chips are manageable DIY projects. However, structural damage or sinking steps usually need a professional evaluation.
Q: How soon can I use the steps after repair?
A: Most compounds require 24–72 hours to cure fully, so avoid foot traffic until the product label confirms it’s safe.
Q: What causes concrete steps to crumble repeatedly?
A: Poor drainage, freeze-thaw cycles, and skipping the sealing step are the most common reasons repairs fail and damage recurs.