How to Build a Retaining Wall on a Slope | A Complete Step-by-Step Guide
Building a retaining wall on a slope is one of the most effective ways to control soil erosion, create usable outdoor space, and improve landscape aesthetics. However, sloped terrain presents unique challenges that require careful planning and proper construction techniques. When built correctly, a retaining wall can provide decades of structural support while enhancing the value of your property.
This guide explains how to build a retaining wall on a slope, from site preparation to final backfilling, ensuring a durable and long-lasting result.
Why Build a Retaining Wall on a Slope?
A retaining wall holds back soil and prevents it from moving downhill. Additionally, it helps homeowners transform uneven ground into functional outdoor areas.
Key benefits include:
- Reduces soil erosion
- Controls water runoff
- Creates level planting areas
- Improves landscape design
- Prevents slope failure
- Increases property value
Furthermore, retaining walls make steep yards safer and easier to maintain.
Choose the Right Retaining Wall Material
Before starting construction, select materials that suit your landscape and budget.
Concrete Blocks
Concrete retaining wall blocks offer strength, durability, and easy installation. Therefore, many homeowners choose them for residential projects.
Natural Stone
Natural stone provides a timeless appearance and excellent durability. However, installation often requires more labor.
Timber
Pressure-treated timber creates a natural look and costs less initially. Nevertheless, timber typically has a shorter lifespan than stone or concrete.
Poured Concrete
Poured concrete walls deliver exceptional strength. In addition, they work well for taller retaining structures.
Tools and Materials Needed
Gather all necessary supplies before beginning work.
Tools
- Shovel
- Wheelbarrow
- Level
- Tape measure
- String line
- Plate compactor
- Rubber mallet
- Landscape rake
Materials
- Retaining wall blocks or stone
- Crushed gravel
- Drain pipe
- Landscape fabric
- Backfill material
- Construction adhesive
Having everything ready helps keep the project organized and efficient.
Step 1: Plan and Measure the Slope
First, assess the slope carefully.
Measure:
- Total slope height
- Wall length
- Soil conditions
- Drainage patterns
Additionally, check local building regulations. Many areas require permits for retaining walls above a certain height.
If the wall exceeds four feet, consider consulting a structural engineer.
Step 2: Mark the Wall Layout
Next, mark the location of the retaining wall.
Use:
- Wooden stakes
- String lines
- Spray paint
The layout should follow the contour of the slope whenever possible. Consequently, the wall will blend naturally with the landscape.
Double-check measurements before excavation begins.
Step 3: Excavate the Foundation Trench
A strong foundation determines the wall’s long-term performance.
Dig a trench along the marked line.
General guidelines include:
- Trench depth: 6–12 inches minimum
- Trench width: At least twice the block depth
Moreover, remove all organic material, loose soil, and roots from the trench.
A stable base prevents shifting and settling over time.
Step 4: Install the Gravel Base
After excavation, add crushed gravel to the trench.
Spread approximately 4–6 inches of gravel and compact it thoroughly using a plate compactor.
This base serves several purposes:
- Improves drainage
- Distributes weight evenly
- Enhances stability
As a result, the wall gains a stronger foundation.
Step 5: Lay the First Course of Blocks
The first row is the most important part of the project.
Place each block carefully on the compacted gravel base.
While installing:
- Check level from front to back
- Check level side to side
- Maintain consistent alignment
Furthermore, take extra time during this stage because errors in the first course affect the entire wall.
Step 6: Build the Wall in Steps
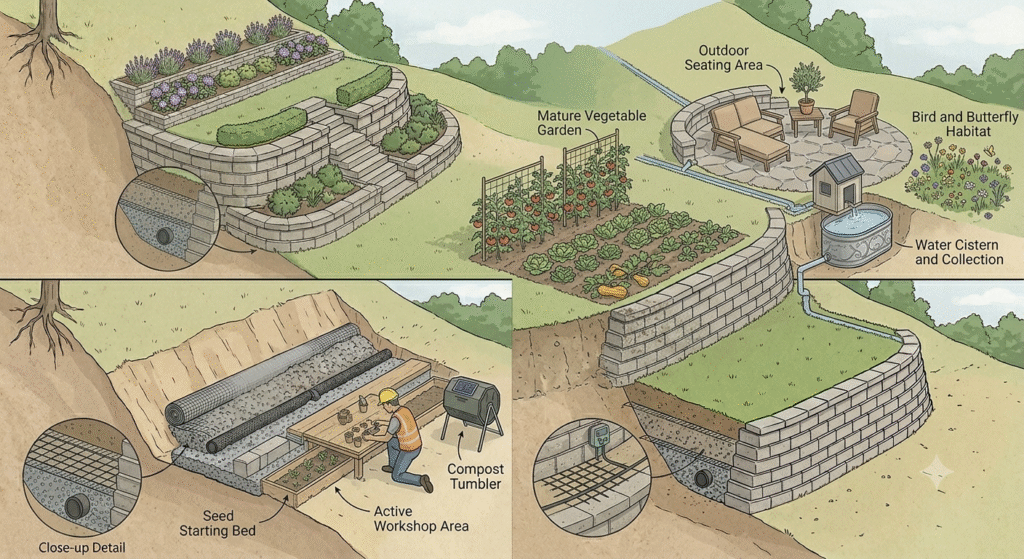
When constructing on a slope, use a stepped design.
Instead of following the slope angle directly, create level sections that step upward.
Benefits of stepped construction include:
- Better stability
- Improved appearance
- Easier installation
Additionally, each step should begin on a properly leveled base.
Step 7: Install Drainage Behind the Wall
Drainage is essential for retaining wall performance.
Without proper drainage, water pressure can push the wall outward.
Install:
- Perforated drain pipe
- Drainage gravel
- Landscape fabric
Position the drain pipe at the base of the wall and direct water away from the structure.
Consequently, the wall experiences less hydrostatic pressure.
Step 8: Continue Stacking Additional Courses
As you build upward, stagger the joints between blocks.
This technique strengthens the structure and improves appearance.
Additionally:
- Follow manufacturer recommendations
- Use construction adhesive when required
- Check alignment frequently
For taller walls, install geogrid reinforcement according to engineering guidelines.
Step 9: Backfill Properly
After completing each section, backfill behind the wall.
Use free-draining gravel immediately behind the blocks.
Then add compacted soil in layers.
Avoid dumping large amounts of soil at once because uneven pressure can damage the wall.
Instead, compact every layer thoroughly.
Step 10: Finish the Top of the Wall
Once the wall reaches the desired height, install capstones or finishing blocks.
Capstones:
- Improve appearance
- Protect the wall
- Increase durability
Secure them with construction adhesive for a clean and professional finish.
Common Mistakes to Avoid
Many retaining wall failures result from poor planning or installation errors.
Avoid these common mistakes:
- Ignoring drainage requirements
- Using an inadequate foundation
- Skipping soil compaction
- Building too high without reinforcement
- Following the slope without stepping
- Using weak backfill materials
Therefore, careful construction significantly improves wall longevity.
Retaining Wall Regular Maintenance Tips
Even a well-built retaining wall benefits from regular maintenance.
Inspect annually for:
- Cracks
- Leaning sections
- Drainage problems
- Soil erosion
Additionally, remove vegetation that grows between blocks and keep drainage outlets clear.
These simple steps help preserve structural integrity.
Conclusion
Learning how to build a retaining wall on a slope requires proper planning, excavation, drainage, and construction techniques. By creating a solid foundation, installing effective drainage systems, and using stepped construction methods, you can build a retaining wall that resists erosion and supports the surrounding landscape for many years. Moreover, regular inspections and maintenance will help protect your investment and keep the wall functioning at its best.
Frequently Asked Questions (FAQs)
How deep should a retaining wall foundation be on a slope?
Most retaining walls require a trench depth of at least 6 to 12 inches, depending on wall height, soil conditions, and local requirements.
Do retaining walls on slopes need drainage?
Yes. Proper drainage prevents water buildup behind the wall and reduces pressure that can lead to structural failure.
What is the best material for a retaining wall on a slope?
Concrete retaining wall blocks are among the most popular choices because they provide durability, strength, and easy installation.
Can I build a retaining wall on a steep slope myself?
You can build smaller retaining walls yourself. However, taller walls or walls supporting significant loads often require professional design and installation.
How long does a retaining wall last?
A properly constructed retaining wall can last 30 to 100 years, depending on materials, drainage, and maintenance.
When should I use geogrid reinforcement?
You should use geogrid reinforcement for taller walls, steep slopes, or areas with significant soil pressure to improve stability and structural performance.